
Why do you need an RV Water Pressure Regulator
RV water pressure regulators are necessary if you want to reduce the risk of flooding and leaks.
You don’t absolutely need a water pressure regulator if you are careful with turning on the city water supply in an RV campground. Some campgrounds have very minimal water pressure and opening the campground’s faucet fully will usually give you enough pressure for a comfortable shower.
Many RV campgrounds have very high pressure gushing from agricultural style city water outlets. This is great, but it is common to have a water leak inside your RV due to this high pressure.
Purchasing items using the provided Amazon links may generate a small commission to Happy Campers RV Repairs which provides income for maintenance of this website. Thank you in advance if you do proceed to purchase using these links.
 What does a water pressure regulator do?
An RV water pressure regulator will limit the maximum water pressure to match recommendations by RV manufacturers. Before I purchased and installed a water regulator, I would open the outdoor shower and turn the shower faucet on fully before turning on the campground water. Then I would very slowly turn the campground water faucet and watch the shower head as it increased from weak drips to a steady flow, but not a strong flow. I was able to do this for years without a problem.
Just recently we setup in a new (to us) campground in Moro Bay, California. We were a little rushed and did not make the time for my standard pressure test ritual. A day or so later, we discovered water seeping from the bathroom and soaking the kitchen floor of our 27 foot Durango fifthwheel. Was it a tank overflow? Could it be the shower doors leaking?
The next day I began checking all water lines and drains, starting under the floor, where I could see a cross section of the fifthwheel’s lower floor section and near to where the leak appeared. The leak was reaching the cargo section of the basement too, but all the water lines and drainage pipes were dry. So I went up a level and checked the bathroom. There is an inspection panel behind the shower faucets and one of the plastic female pipe threads presented the constant one drip per three seconds. Enough to cause a minor flood over a period of hours!
I proceeded to shut down the water supply and prepared to replace the plastic 90 degree elbow fitting with a new one. When I began to remove the original fitting, I discovered it was fairly loose. I only had to correctly tighten the fitting and the leak stopped! Hand tight plus a quarter turn and problem solved!

In the weeks after my own personal experience, I have had several service calls for drips and minor floods in other RVs. And when I checked the water pressure, it was way above the recommended 40 to 50 psi. I now recommend all owners to take the guesswork out of the water pressure in their RVs and add a water pressure regulator.
A regulator costs between $10 and $50 depending on the level of features you choose. There are more advanced models valued in the hundreds of dollars too. You may want to consider one of these if you have a large RV with one and a half baths or the like.
Which one to buy?
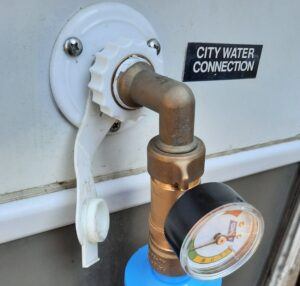
There are three types of RV water pressure regulators ranging between $10 and $50. There are two lower priced versions that only need to be screwed onto the hose and the regulator will automatically maintain the optimum water pressure within your RV’s plumbing lines. One of these non-adjustable regulators has a gauge to see what water pressure is being supplied to the RV. This is great if you want to actually see how much water pressure you are getting in your RV. A green range shows the useful operating range.
The RV water pressure regulator with the most options contains a monitoring gauge and a pressure adjustment. You can manually adjust the pressure to suit your needs and always have the maximum recommended 60psi of water pressure your RV. Remember to check and adjust your water regulator when you move and also remember to take your regulator with you when you leave!
Purchasing items using the provided Amazon links may generate a small commission to Happy Campers RV Repairs which provides income for maintenance of this website. Thank you in advance if you do proceed to purchase using these links.
How tight should plastic RV plumbing connections be?
Plastic fittings require gently hand-tight, then a quarter turn to properly seat. You never need to use a wrench or grips to stop a leak on a properly seated plastic pipe fitting. If a leak persists, then you need to check if the thread and washer are clean. These fittings are damaged easily or can be manufactured poorly, so I find if the fitting won’t stop leaking with ‘hand-tight plus a quarter turn’, then it is best to replace the fitting with a new one. Adding sealing paste or teflon tape usually won’t repair a leaking plastic fitting, so save the hassle and just replace the whole fitting.
RVs have similar plumbing to homes, why does the pressure need to be so low?
When an RV is tested in the factory, the maximum pressure test is set at 100psi. An RV is subject to a lot more movement than a home. Bumps and shakes, and rapid changes in temperature creates much more wear and stress on an RVs plumbing. Leaking connections can appear if the road vibrations have stressed one of the junctions in the plumbing lines. Keeping the pressures lower helps keep the unions and connections secure and save any potentially damaging water leaks in your home on wheels.